Flow Coder
What is Coder?
Coder is a command-line interface (CLI) tool that transforms how developers, non-developers, and AI enthusiasts create and generate code. Coder optimizes time, increases efficiency, and simplifies the complexity of developing new applications by generating code with the power of AI.
Join our Flow Coders community — Together, we share and connect with other users.
Tech Talk about Coder
Access the link, log in with your corporate account
Installation
With Python installed, simply install it with pip.
Windows
pip install https://storage.googleapis.com/flow-coder/flow_coder-1.3.1-py3-none-any.whl
Ubuntu / Mac
Note
You need to have pipx installed.
pipx install https://storage.googleapis.com/flow-coder/flow_coder-1.3.1-py3-none-any.whl
Note
Don't forget to periodically check for updates to Coder; it will notify you most of the time. To update, just run the command coder update.
Using Coder
Currently, Coder has some key commands for developing your code. See the step-by-step guide below to use them accurately.

Authentication - Coder Auth
-
Add: Add an authentication to Coder. Flow users may be part of multiple tenants, so it's possible to add several authentications. To add an authentication, you first need to generate a client secret and a client id in Flow. To do this, log in to Flow in your desired tenant, click on your name's initials, then on settings. In the Your Profile tab, click on API Keys and then on
Create Api Key, give your key a name, and save it. A panel with the data will be displayed; copy and paste it to a safe place as you will not be able to see these values again once you click close.coder auth add --tenant <your tenant> --client <your client id> --secret <your client secret>Command help
Usage: coder auth add [OPTIONS] Add a new tenant with its API key and set it as the active. For generating API keys (client/secret), visit: https://flow.ciandt.com/settings/api-keys Example: coder auth add --tenant my_tenant --client my_client_id --secret my_client_secret Options: --tenant TEXT The tenant ID. [required] --client TEXT The client ID. [required] --secret TEXT The client secret. [required] -
List: To list all the tenants you have already logged into, run this command.
coder auth list
Initialize Coder in a folder - Coder Init
Choose a project folder where you will work with Coder. It can be at the root of the project, but it can also be in a more internal folder of the project to limit the scope it will work with and make it easier to have a smaller context window.
cd work_folder

coder init
Sessions - Coder new
To start interacting with the AI, you need to start a new session. This command is similar to starting a new chat in the graphical interface. If you start a session without a name, it creates a random name for the session.
coder new
Command help
Usage: coder new [OPTIONS] [SESSION_NAME]

  Create a new session.

Options:
  -i, --include TEXT  Folder to be included in context. Can be used multiple
                      times.
  -h, --help          Show this message and exit.
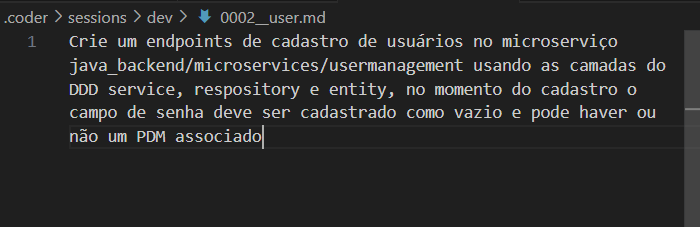
When a session is created, a session folder will be created at .coder/sessions/session_name containing markdown files that will be used for communication with the AI. The files are composed of a number followed by the role; files containing __user.md are your inputs, and those containing _assistant.md are the AI's response.
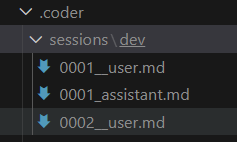
Always open the latest __user.md file; this is the file where you will type your prompt and request something from the AI.
example:
Sending the request to the AI - Coder Run
Once you have typed the prompt in the file, it's time to send it to the AI and receive its solution. Just run the run command.
coder run
Command help
Usage: coder run [OPTIONS] [PROMPT]

  Run user prompt in current session.

Options:
  -n, --name TEXT    Specify the session name.
  -a, --apply        Automatically apply the session after running it.
  -b, --bind TEXT    Bind key=value pairs to replace templates, with {{key}}
                     format, present in user prompt.
  -f, --from PATH    Specify a file path to use as the user prompt.
  --no-stdin         Do not read from stdin for the user prompt.
  -o, --output PATH  Write assistant output to PATH or STDOUT (if -o is passed
                     without a value; progress goes to STDERR).
  -h, --help         Show this message and exit.
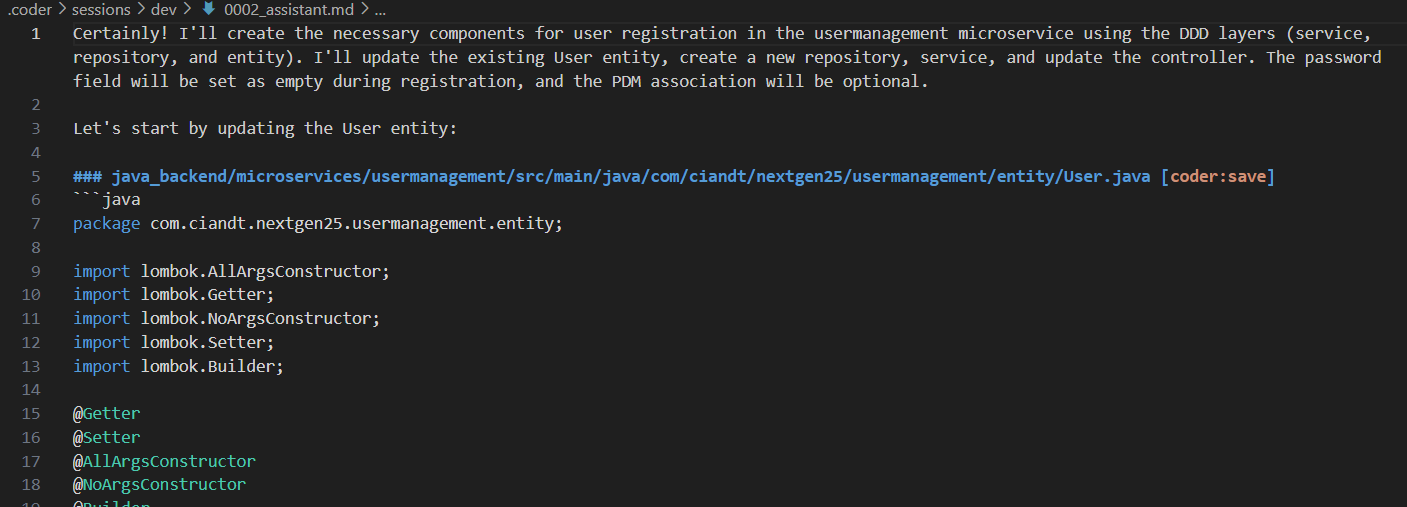
The AI's response will be delivered in the _assistant.md file, prefixed with the same number as the __user.md file used for the prompt.
Applying the changes - Coder Apply
Once you have reviewed the response provided by the AI and everything is correct, run the command to apply the changes directly to the codebase.
coder apply
Configuration and Context Window
Context Window
Each AI model has a specific context window, which basically refers to how many tokens can be sent in a prompt (a token usually represents a word, but not always, so it's hard to calculate just by counting words). Coder works by sending the entire project code as part of the prompt. It scans all files in the folder where it is operating and sends the content of the files depending on how it is configured in .coder/config.yaml. If this content exceeds the maximum number of tokens the model accepts, it will result in an error when you run coder run.
Configuration
In the configuration file, you can choose which model to use and how Coder will handle the context window. See the possible options below.
coder:
  persona: |
    You are a coding expert.
  model: flow-bedrock-claude-37-sonnet
  context:
    mode: compact
    scope: selected
    selection:
      model: flow-gemini-2.0-flash
      step: 10
      limit: 20
coder
-
persona: Description of the persona for the AI assistant.
- Default: "You are a coding expert."
-
model: The AI model used for code generation and assistance.
- Options:
- flow-openai-gpt-4o
- flow-openai-gpt-4o-mini
- flow-bedrock-claude-37-sonnet
- flow-bedrock-nova-lite
- flow-gemini-2.5-pro
- flow-gemini-2.0-flash
- flow-foundry-deepseek-r1
- Options:
context
-
mode: The level of detail for the file content.
- Options:
full: Includes the full file content.compact: Includes a reduced version of the file content (experimental).
- Options:
-
scope: The scope of files to be included.
- Options:
all: Includes all files.selected: Includes only selected files (experimental).
- Options:
-
selection:
- model: Model used to select files for the context.
- step: Step for the new file selection in each session run.
- limit: Limit for the number of selected files.
Mode and Scope Combinations
- full/all: Includes all files with full content. Ideal for smaller repositories. Supports ~10k lines of code in GPT-4o.
- full/selected: Includes selected files with full content.
- compact/all: Includes all files with reduced content.
- compact/selected: Includes selected files with reduced content. Supports >200k lines of code in GPT-4o/Gemini-Flash (experimental).
Choice Based on Project Needs
Choose the mode and scope combination based on your project's needs in terms of accuracy and optimization.
Coder Ignore
To further reduce the context window, we can use the .coderignore file, which is already generated by coder init. It follows the same rules and syntax as .gitignore.
For this project, it is important to add the following items to .coderignore.
node_modules
site
docs
docx
*.zip
*.pdf
*.docx
*.log
cache
.cache